You are here
Q&A and Download Info
Get to the Root Cause...
We will be posting many of the frequently asked questions we have had over the years, and their supporting answers. Coming Soon! Eventually, we will be allowing you to post your questions.
Question:
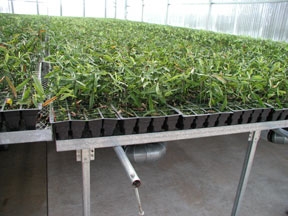
Is drip irrigation or spray stakes a practical alternative to overhead irrigation for 1- and 3-gallon containers?
Answer:
For 1- and 3 gallon containers, there is no practical alternative to overhead sprinklers. Yes, they waste a lot of water, but the cost and complication of using spray stakes, etc. is not the answer. Drip emitters over the top of 1 gallon does not work, mostly because of the expansion and contraction of the poly lines and not getting the water where it is needed.
Question:
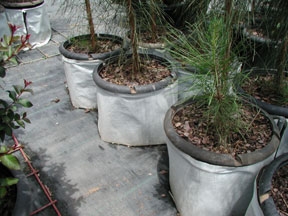
What would be the best way to handle trees grown in Knit Fabric containers when they are harvested?
Answer:
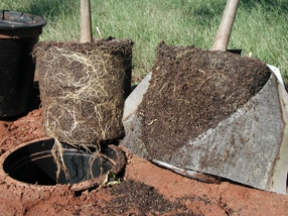
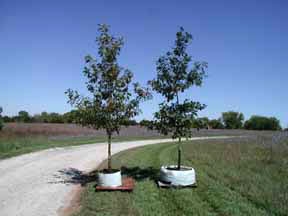
We suggest that harvested trees in Knit Fabric containers be placed above ground and NOT mulched in. The main reason mulching is done is to keep B&B trees from blowing over and to aid the tree, since 95% or more of the roots were lost in harvesting. If you place the trees grown in Knit Fabric containers above ground, the flat bottoms help them stand erect and if you do not mulch, you get air-pruning around the outside. Once above ground, and when not mulched in, with the first flush of growth the tree will produce another cycle of root branching within the rootball which will also be air-pruned. The primary reason for moving trees grown in Knit Fabric containers into containers is appearance and ease of handling. Once trees are harvested and placed above ground, the Knit Fabric containers are unattractive. When placed in RootBuilder® or RootTrapper® soft-sided containers, the trees look great, especially in the white RootTrapper®, and are available to sell all summer.
Question:
How far off the ground should Rootmaker® propagation containers be located to get proper air-root-pruning?
Answer:
It depends on your location and growing conditions. If your containers are out of doors in full sun with moderate air movement, then 10 to 12 inches is probably sufficient. If you are growing seedlings in a structure where air movement is limited, you may need to have your wire benches 16 – 24 inches above the floor. If you are seeing roots, even just small tips of roots extending a short distance out of the air-root-pruning openings, you do not have sufficient air circulations or height above the soil surface for your location.
Question:
Do 1-gallon and 3-Gallon RootMaker® containers need to be elevated to achieve air-root-pruning?
Answer:
No. The bottoms of the round and the square one gallon containers as well as the 3-Gallon containers are designed to be placed on ground cover cloth or plastic. Air-root-pruning is accomplished by air circulation around the containers at both sidewalls and drain holes at the sides of the bottoms. The only situation I have observed where air-root-pruning on the sides was marginal was where the square 1-gallon containers were placed snugly together and were more than 6 containers wide. Some roots in the center of the blocks had roots extending ½ outside the openings. If you use the square 1-gallon containers in blocks greater than 5 or 6 wide, leave a small amount of space between containers for air circulation.
Question:
What is the best way to install 5-Gallon Grounders™?
Answer:
A 12-inch auger works well, especially if it is fitted with a depth control leg that insures that each hole is 7 inches deep, even if the ground is somewhat uneven. I took the “teeth” off my 12-inch auger and sharpened edge of the auger flighting. This gives a clean hole with a flat bottom. If the holes are made 7 inches deep, the top ring of the side ledges with holes are in contact with the surface of the soil and the rest are below the surface. With the ring of loose soil around the holes, and with rain, soil will infiltrate back around the container and fill any voids. Augering works best if the containers are spaced roughly 2 to 2.5 feet in the row and the rows are 6 feet apart. I have also modified a single shank lister plow for installing 5-Gallon Grounders™. This was accomplished by cutting off the 2 sides so that it was about 11 inches across. Then, I welded flat steel plated to both sides. When pulled through the soil, it leaves a trench at the depth you choose and about 11 ½ inches wide. The 5-Gallon Grounder™ fits into the space nicely. After all of the containers are placed in a row, soil is pushed back into the trench between the pots. This works well if the containers are spaced roughly every 2 feet in the row and the rows are 4 or 5 feet apart.
Question:
How long will the socket opening in the soil for the 5-Gallon Grounder™ last before the field needs to be tilled or sub-soiled
Answer:
There is no precise answer here as soils are extremely variable. However, if you suspect that the soil is becoming sufficiently compacted to restrict oxygen and inhibit root growth and drainage, do a perc test. Simply remove the container, fill the hole with water, wait about 30 minutes and fill the holes again. If the hole is still holding water after 24 hours, it flunked the perc test and actions should be taken at the earliest opportunity.
Question:
Do I use field soil, potting mix or a combination in the 5-Gallon Grounder™?
Answer:
A good soilless mix works best. Because there is little contact between the soil outside and the mix inside, a mix should be used. This is a distinct contrast to the Knit Fabric container where there is a great deal of contact between inside and outside through the thousands of small openings. Remember that the soils must drain well for a soilless mix in the Grounder™ to work well.
Question:
If my soils are heavy and do not drain well, can I use the 5-Gallon Grounders™ above ground?
Answer:
Yes, Simply set the container on the surface of the soil and fill with a soilless mix. As roots grow out the holes in the ledges in the sides, they will be air-root-pruned. Yet the roots that grow through the holes in the bottom will extend into the soil below and both anchor the plant and accelerate growth. Another technique that works well on heavy soils is to set the 5-gallon Grounder™ on the soil and surround the containers with a good mulch that drains well. This could be pine bark, wood chips or simply sand. This mulch material allows roots to grow out and speed plant growth and insulates the roots in the containers from excess heat and cold. This procedure is working well for a RootMaker® grower in the Chicago, Illinois area.
Question:
Will Ligustrums grow well in the 5-Gallon Grounder™?
Answer:
At this point in time I know of no shrub, even shrubs that are often grown as small tree forms, that do not grow well in the 5-Gallon Grounder™. The only tree that I do not like in this container is Pecan and that is because the root tips are so large that they do not grow through the openings and instead circle.
Question:
Do the walls of the hole need to be roughened after augering and before Knit Fabric container is installed?
Answer:
No. When the Knit Fabric container is installed and filled with soil, the fabric is pressed firmly against the outside wall of the augered hole. When roots grow out and contact the fabric, they are guided into the surrounding soil with no opportunity to circle. However, if the soil is so heavy and/or the soil was moist enough to cause glazing of the sidewall of the hole, you should reconsider your planting procedures. By creating berms 6 to 8 inches high in the rows and installing the Knit Fabric containers in the center of the berms, drainage will be improved substantially. Remember, if oxygen is limited, root growth will be slow. If your soil is particularly subject to glazing of the sidewalls, you will likely benefit from growing a soil building crop such as sudex between crops and using the berm technique.
Question:
What do most nurseries do with trees that have been grown in Knit Fabric containers after harvesting?
Answer:
A current estimate is that 50% remove the Knit Fabric container and place the trees in above ground containers for finishing. The RootBuilder® container is working well in this capacity. The other 50% are harvesting trees, allowing 3 or 4 days to “cure”, then stretch wrapping the root ball and sending it to landscape jobs. A few are removing the container at the nursery before covering with stretch wrap in order to insure that the fabric is removed at the time of planting. (Note: It is important that instructions are clear that the Knit Fabric container must be completely removed prior to installing in a landscape.)
Question:
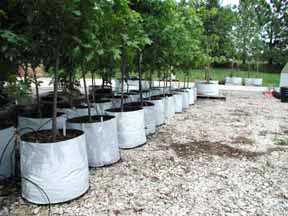
What is the best material to use beneath RootBuilder® containers?
Answer:
If the plants are to be in the RootBuilder® container a matter of 2 or 4 months and are not particularly tall or have a large head, it may work best to use 6 mil poly. This stops all roots from leaving the confines of the container and all are air-root-pruned on the container sides. If you will cut squares of 2.5 to 3 ounce weed barrier type fabric and place inside the RootBuilder® container after it has been placed on the plastic, the roots will grow into the thin fabric and secure the bottom more rapidly. If plants are to be grown in the RootBuilder® for considerable time or if they are particularly tall or have a large head, it is best to use squares of the RootBuilder® Base material. This material is a knit fabric similar to that used in the Knit Fabric containers, but has been coated with vinyl to make it especially tough and long lasting. Simply place the material on the ground cover cloth or on bare soil and set the RootBuilder® container in place, and fill with potting mix to surround the root ball of a tree previously grown in a Knit Fabric container or harvested with a tree spade. Roots will grow through the RootBuilder® Base and anchor the plant against all but severe winds. At the time of sale, rock the tree back and forth (most species) or tilt and cut roots with a sharp flat bladed shovel (elms and members of the legume family).
Question:
What do most customers do with trees that have been grown or established in RootBuilder® containers at the time of sale?
Answer:
It is not necessary to ship the plants in the RootBuilder® container for the root ball to stay together because the roots are so fibrous. The technique that both customers and nurseries are pleased with is to lift the trees at the nursery, remove the RootBuilder® container and cover the root ball with black stretch wrap. This gives the nursery the re-use of the container without the fuss of deposits and returns, and the customer will have less to handle and dispose of at the landscape site. It is best to use black stretch wrap. Clear stretch wrap will cause a “greenhouse effect” that will accelerate heating and lethal root temperatures could be reached.
Question:
Will RootSkirts® restrict airflow and increase humidity around the outside surface of RootMaker® container and interfere with air-root-pruning?
Answer:
With good watering practices, NO. Research with a number of species has not shown this to be a problem with good water management. However, if you over water continually and have water exiting drain holes after each irrigation, air-root-pruning would be reduced. However, once plants are removed from such a humid environment, any roots outside the container wall will be dehydrated and will not be a problem.
Question:
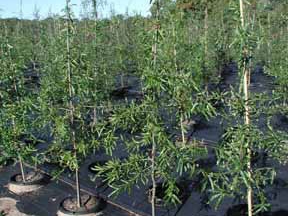
What is the minimum spacing for 10 to 24 inch Knit Fabric Containers?
Answer:
For Knit Fabric, in-ground, containers the spacing should be roughly 4 foot centers for nearly all species. Consider the growth and development of trees in 12 or 14-inch containers versus 18 inch. Trees in 12 of the 14-inch containers will typically be harvested when the stem diameter is 2 inches. For trees in 18-inch diameter containers that are going to be grown to a larger size (one more growing season) the removal of the lower limbs should begin at this point. As the longer lower branches are removed, the branches at a point roughly 4 feet above the ground are not as long and therefore can be left to grow another growing season without appreciable interference with each other. On the other hand, if 24-inch diameter Knit Fabric containers are used, the spacing should be about 5 to 6 feet on centers to allow for proper branch development on a tree of 3.5 to 4.0 inch stem diameter. As for spacing between rows, 10 feet is very workable for most species. The only reason to use rows wider would be if your machinery were of a larger size. Spacing trees 4 feet in the row and 10 feet between rows provides approximately 1000 trees per acre. Remember that most plants have developed methods that allow leaves in the inner branches to function similarly to those in full sun. There are only a few species that are particularly sensitive to shading by an adjacent plant; those are primarily the pines, and other conifers and particularly bald cypress.
Question:
Will there be any benefit to using RootMaker® II Propagation trays to grow vegetables and floral plants?
Answer:
RootMaker® containers, including RMII-32 propagation trays work on annuals, perennials, vegetables, etc. just as they do on woody plants. The more the root system is forced to branch the more the nutrient absorptive surface is increased, which in turn increases growth and overall plant health. Interestingly this has also increased both flower production and fruit production for same reason – more roots. Typically, plants grown in smooth round containers are taller and more slender and have fewer branches and flowers compared to those grown in RootMaker® containers.
Question:
Is there any way that I can germinate seeds then transplant them to RootMaker® containers as soon as they pop and still maintain RootMaker® grower certification?
Answer:
There is nothing wrong with germinating seeds in flats then transferring seedlings to RootMaker® trays – as long as it is done when the seedlings are quite small. This is what I practice at Lacebark for many of the species I work with – and primarily because seed germination can be so unpredictable and in order to get 32 of the same size in one tray, compared to a few big ones that over shadow the smaller ones.
Question:
What product do you recommend for keeping weeds from trees for the first few years?
Answer:
Treflan and Pendulum granules are safe and effective ways to reduce lots of weed species. Spot spraying with Roundup® where Chaps® protects stems or using a shielded nozzle works well for perennial weeds and those that are not controlled by Treflan and Pendulum. (See Spring 2001 Newsletter)
Question:
Do you have any information on the use/success on the out planting of container seedlings grown in RootMaker® II containers directly in the field for conservation/reforestation type projects?
Answer:
Tree seedlings in RootMaker® II propagation containers are routinely taken to the field when they are 12 to 16 inches tall and 3 to 4 months old. This has been done by hundreds of nurseries across the country. Most do fall planting – September or October and some have drip irrigation and others do not. (Drip irrigation assures nearly 100% survival. But even without drip irrigation, the success rate is quite high, except for the occasional severe drought immediately following planting). The primary reason for planting tree seedlings at a larger size is that in the small growth stage, telling seedlings that will make winner trees from culls is tough and the cull rate may be as high as 25 to 30% or more for the oaks. In one gallons, the cull rate drops to 7 to 10% and with 3 gallons to 2 to 3%.
Question:
What are the differences between the types of RootTrappers®?
Answer:
The white RootTrapper® conserves water, greatly slowing water exit and creating a fibrous root system which is more efficient in water absorption. Because of this, it may be necessary to reduce your watering program. For example, according to our research, 8 hours after watering, a porous sidewall black fabric container loses 64% more water than a conventional plastic pot and 80% more water than a RootTrapper®. The RootTrapper® II has the bottom two inches of the sidewall not laminated. This improves drainage and aeration where the soil column needs it most, while not exposing the entire sidewall to excessive evaporation and water loss. The RootTrapper® “Grounder™” version has a porous base that allows roots to penetrate and thus tack to the ground to greatly reduce blowover and reclaim some water and nutrient runoff. Drainage is also greatly improved with this modification. RootTrappers® also can be specially made to fit your socket pot to solve the problems of in-pot productions. Root escape is almost non existent and a fibrous root system is created. Additionally, when harvested, root temperature is much lower because of the white outer surface. Consider the water requirement/tolerances of the species and nursery site conditions such as soil type, wind, and topography to determine which version is right for you.
Question:
Many of my seedlings in the Express® 18 cells are hard to remove. I have to really pull on the stems to get them out. Any suggestions in handling future crops?
Answer:
Determining the optimum time to remove seedlings from containers will vary season to season and at your location versus another grower. Remember, it is always better to remove seedlings early, even if this means a small amount of mix falls away, versus leaving the plants too long. The plants were difficult to remove as a result of two factors:
1. They ran out of space for additional root growth. There are sequential flushes of roots as root tips are air-pruned and secondary roots are produced. With the production of the third flush of branch roots, there is little additional space for these new roots to exploit, so they fill any remaining small voids.
2. As the seedling grows on top, so do the roots, both in numbers as a result of air-pruning, but also roots grow in diameter. It is primarily the increase in diameter of the roots that puts pressure on the sidewall of the container and makes removal more difficult. In the future, consider transplanting seedlings just as the root ball can be easily removed and into a container large enough to support additional root growth for the rest of the growing season if space and overwintering are factors or into the next step up in container size relative to your production goals. Think of transplanting like driving a truck---- If you make timely transplants, you keep the plant growing, what I call "full throttle". On the other hand, if you leave the plants too long and they approach or come to a full stop, it takes considerable time and wasted energy to get growth rolling again.
Question:
Would a RootMaker container benefit annuals, perennials, and vegetables?
Answer:
There are transplanting benefits when the root system of any plant is improved. A seed of every plant starts out with a taproot. The sooner this taproot is stopped and secondary branch roots are stimulated, the greater the benefits. Some plants are more forgiving and produce secondary roots more readily. In general, the woodier the plant, the more dramatic the results.
Question:
Would a RootMaker 3 gallon or larger benefit a plant or tree not started in a RootMaker?
Answer:
Some root pruning is better than none. To maximize the root pruning efficiency, one might consider the RootBuilder High 5. Be sure to cut any circling or kinked roots on the outside as you transplant from a conventional pot to a RootMaker.
Question:
What container mixes do you recommend?
Answer:
For propagation: Use a mix of about 50% perlite to 50% peat or aged pine bark, peat and perlite approximately 2:1:1 by volume. To this add 6 pounds of 18-6-12 Osmocote (NO substitutes), plus one pound of Micromax, plus a small amount of dolomite ONLY if you have very little calcium in your water supply (no more than 4 lbs per cu. yd. max.). Leave the seedlings in the containers for 6 to 12 weeks, depending on the species and weather conditions. Topdress with Osmocote 19-6-12 at a rate of about 4 pounds per cu yd when the seedlings are about 2 to 3 inches tall. How do I determine the amount to apply? Consider that the original RootMaker® container holds approximately 14 cubic inches volume (the RootMaker® II 32-cell tray hold about 11 cu. in. and the 18-cell tray holds 25 cu. in.). There are 46656 cu in per cubic yard, so divide by 14, which equals about 3,300 containers to equal one cubic yard. Therefore _ pound of Osmocote should be spread over about 400 containers for the 14 cu. in. original RootMaker®, or over about 530 cavities of the 32-cell tray (16 trays) or over about 233 cavities of the 18-cell tray (13 trays). Standard mix: A mix of 3 parts ground pine (or other conifer bark), plus 1 part good Canadian peat, plus, 1 part concrete sand makes a good growth medium for most species of plants in containers. To this mix add the fertilizers noted above. Keep in mind that if you mix three cubic yards of ground pine bark plus one cubic yard of peat and one cubic yard of sand, you DO NOT end up with five cubic yards of mix, but rather with about four cubic yards. The reason is that the various shaped particles fit together and the volume shrinks by roughly 15% to 20%. Because plants grow in the reduced or final volume, always add any nutrient additives based on the final volume and not the initial volume. Also, a compressed 3.6 cu. ft. bale of peat expands to make about 6 cu. ft. The growth medium is the mix of materials used to fill the container. It is NOT soil, and should not contain any soil. Soil is a mix of aggregates and very fine particles. If a small amount of soil is added to a container growth medium the fine particles will erode to the bottom of the containers and complicate drainage.
Question:
Dr. Whitcomb, what fertilizer program do you recommend for small trees?
Answer:
Osmocote or similar coated slow release N,P,K fertilizers work best. For example, even though on the bag, Osmocote 18-6-12 says 8 to 9 month release, on or in the soil, this product will slowly release nutrients for two growing seasons. The reason is that Osmocote and most other coated slow release products release based on temperature and the calibrations are for when they are used in above ground containers. Because on or in the soil is much cooler than a container, the release of nutrient is much slower and therefore over a much longer time. This also means that more is needed to be applied initially since it is slower and releases over a longer period of time. Not only is the slow release desirable and little if any is lost to leaching, it is very safe and one has to nearly mulch a young plant with Osmocote in order to cause injury or burn. Osmocote and similar products are more expensive, but in light of the safety and you only need to do it once for the growing season, in my opinion, they are worth the extra cost. This is what I use personally when planting individual items in the field or landscape. I typically apply about 1/4 pound over an area about 2 feet by 2 feet, because from my research roots will extend out much faster and further that is generally realized. And it is important to remember that when trees are grown in the green knit containers in the ground, root growth outward is not restricted initially. Only after the root has grown out and is absorbing nutrient and increases in diameter, does the girdling occur at the small openings to block most of the sugars from the leaves from going back out to the root tips. I describe the roots outside the fabric wall as nurse roots, they contribute substantially to growth of the young tree, yet when the tree is harvested and transplanted elsewhere, the loss of those outside roots is of minor consequence. Organic fertilizers are also good. Organic fertilizers cover a huge range and some are very good products and others are of minimal value. They are quite safe and it is difficult to damage or burn a young tree with organic fertilizers. The organic fertilizer I have had the most favorable experience with is Milorganite. This is a modified sewage sludge out of Milwaukee, WI and is widely used by the golf industry on greens and tees because of the performance and safety. In this case follow the rate instruction on the bag. I DO NOT recommend using dry chemical quick release fertilizers on small trees as it is difficult to get the rate per unit of surface area correct. After applying the 100 pounds of nitrogen per acre rate in the field, then looking at the dispersal of the granules, it does not look like very much. And, as a result, when applying dry a chemical fertilizer around young plants it is tempting to apply more, since the proper rate looks like so little. Just last spring, because I was out of Osmocote, but a rain was forecast so I fertilized about 25 young pine trees 3 to 4 feet tall with the 28-4-5 chemical fertilizer we use in the field and proceeded to damage 11 of them because I applied too much relative to conditions at the time. In my case, I applied the fertilizer, the next day we got about 1/2 inch of rain which was enough to dissolve the fertilizer and move it into a limited volume of soil, then it turned off dry and it was 13 days before any more rain fell and these trees were located such that they could not be irrigated. The concentrated fertilizer caused a salt burn to roots near the surface as the soil dried out and caused partial defoliation --- and this is after conducting research in the area for nearly 50 years. So, yes, dry chemical fertilizers can be used, but be careful as it is very easy to get too much. Here at the research farm we do use a dry, quick release chemical fertilizer with analysis 28-4-5 but only on our field soils. This fits our needs well and has performed well in our field soils over the years. We broadcast this down rows of trees in the field in a band about 6 feet wide and at a rate of about 100 pounds of nitrogen per acre once in the spring and it lasts all season. This is because our soils have a hard layer down about 12 to 16 inches that makes drainage slow but adequate for the many species of plants we are working with. If soils are sandier and drainage is greater, applying the same amount per season, but applied in two applications would likely work better. Applying 100 pounds of nitrogen per acre of soil surface means spreading roughly 350 pounds of actual material out of the bag. With a fertilizer spreader that has been properly calibrated, this works well and requires a modest amount of time.
Question:
What is the best way to handle grape plugs not grown in RootMakers, left too long in the container with tightly wound roots?
Answer:
I have studied this issue at length and with an assortment of species, but not with grapes. But, from my years of experience, which included studying and growing grapes in a variety ways, my thought is that grapes will behave like all the other species. My suggestion is to remove the plants from the containers and using a machete or large knife, cut off the bottom one inch approx. Then shake the mix off and locate the bottom of the original plug. The objective is to cut off the bottom of what was the original plug at or just slightly above the point where the sides began to taper into the funnel like bottom. If the original plug was only three inches deep, stop there. If the original plug was four or five inches deep, then you can cut off more from the bottom, but leaving roughly a three inch mass of roots. If the grape roots have circled in the old plug container, after cutting off the bottom, take a pair of pruning shears, insert the thinnest part up through the center and make one cut. When growth begins, new roots will grow primarily from the cut faces of the roots and from what is now the shortened length of the plug. The many species I have studied this on have all responded well, with the only losses, the occasional plant that had only one or two roots originating from the cutting or seed and got broken during handling. I also suggest that if you have a greenhouse, you pot these plants up soon in for example, a one gallon RootMaker, and monitor the water closely. Growth should begin relatively soon and the plants will be off and headed for an improved root system.